Welcome to our Documentation page!
Recommended: If you want to make sure you don’t miss anything and have no awkward occurences further down the road, just read the entire site from top to bottom. This will make sure you are as prepared as you could be on your journey to being a Team Member!
Hi! I’m Pxnt.
On this page, I will try my best to guide you to becoming a contributor of the Normalisation Project as well as answer any questions you might have now or later about this project.
In the course of the tutorials presented on this page, you will be creating and editing your own page, which the project lead will take as a welcomed symbol of you taking the time to learn more about GitHub and our project!
As being able to speak English is generally required as a team member, this page is only available in English.
Contents
- Guidelines (Must-read for every member!)
- What is GitHub?
- How do I create an account?
- How do I navigate GitHub?
- How do I use markdown?
- How do I join the project?
- How do I translate a page?
- How do I add new Norms?
Guidelines
This section is very important. By becoming a Team Member, you certify that you have read at least this section. If you make a mistake, while we acknowledge making mistakes is human, we will judge you with the assumption that you have read this section.
Being Team Member of the Normalisation Project carries both great power and great responsibility with it. You are given the ability to modify every page, every word written on the website, and there is nothing between you pressing “Commit” and the website publishing your changes for the world to see. This means, it is your responsibility to ensure that what you add to or remove from the page is within the best interests of everyone involved, that means your fellow members, the project lead as well as the broader Build The Earth community as a whole, which uses our website as a resource and guideline.
Section 1: Common Sense
Generally speaking, everything in these guidelines should be common sense. We ask you, dear reader, to always observe your own actions when working on this GitHub project. This means: ask yourself, “is this okay to do?”, and if the answer is anything but a “definitely!”, don’t hesitate to read up on these Guidelines or ask a Core Team- or Advanced Member.
Section 2: Translations
This project features translations into any language that we have members to support it with, and is open to any new members contributing to new languages or joining to help with an existing one.
While translating, you should attempt to translate in a way that retains the meaning and emphases that are set in each text section, while making sure the text is also nice to read in your language, similarly to how Wikipedia articles are written.
We cannot ensure the quality of each translation due to very obvious language limitations, so we rely on trust and feedback to ensure the quality of each contribution.
There is no upper limit to how many people can work on one language, but members are encouraged to also consider contributing to other areas of the project if there is nothing to translate at that time.
Section 3: Contribution
Besides translating a norm, section or page, there is also adding new content or norms. For many norms and additions, we recommend at least asking someone of the Core Team before making a change or addition, to ensure that said addition is in everyone’s best interest. For large additions, we may even create votes.
Otherwise, it is fine to add small details where you deem appropriate and sensible, as long as they don’t alienate a norm or section or change the context significantly.
Section 4: Griefing
We consider an action griefing, if it is done with evil intent. This could mean the removal of content, addition of offensive or illegal content, or other actions.
Sometimes, bad mistakes (such as accidentally deleting an entire folder including its contents, which should be very unlikely) can also be considered griefing and can be treated as a lighter version of this.
We react to griefing on a term-by-term basis. If it is evident that someone seeks to destroy the website or an individual page, we are likely to remove said person access to the GitHub, and will then assess the situation.
Note that everything on GitHub is saved including its history and authors, so it is easy to revert a file to a previous state, making griefing a waste of everyone’s time.
What is GitHub?
Starting from the very beginning, eh? No worries! We intend to be welcoming to even the most unfamilliar-to-GitHub people out there - so not knowing what you’ll be working with is absolutely no problem!
GitHub is a platform to collaboratively code (in our case, write) on one project together. Everyone can contribute to the project within their own abilities, in our case mostly which languages they speak and what fields they are interested in. There is no experience with coding needed to manouver the website, and with a little time I’m sure you’ll know the site like your own back pocket - and who knows, that might even serve you in your own future!
Creating an account
Before you can work on anything on GitHub, you’ll need an account. If you don’t have one already, you can create one right now on the Sign Up page. We will need to know your username once you decide to join and become team member, as we like to let users skip the per-page verification process and directly submit to the website.
Navigating GitHub
There is a slight learning curve involved with moving around on GitHub, so here’s some key things you might want to know about using the site. Just follow this tutorial along, I recommend that you open the pages as they are talked about so you can see what I’m talking about.
Section 1: Navigation
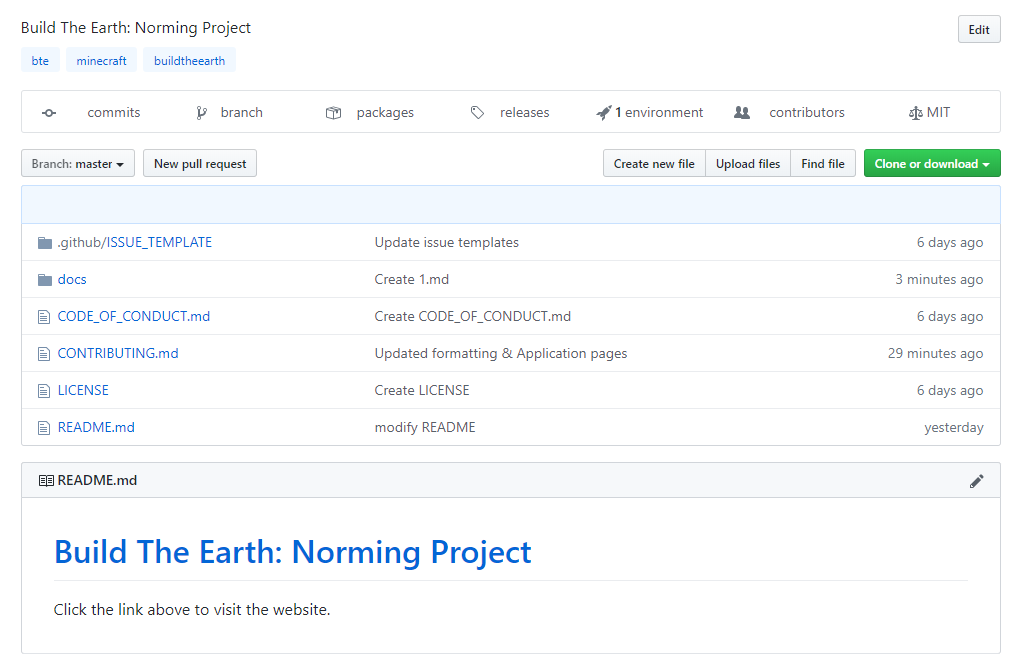
Generally speaking, projects like ours are presented on GitHub similarly to a folder with files in it. This folder, in our case, is located at /BTE-N/bte-n.github.io. Press the link and take a look! Here, you see a few files and folders already, as well as the README.md, which is in our case used to send confused people straight to the website, as this super secret behind-the-scenes business is only for you and me! Well, and a few other people.
To move around in this file system, you simply press on the file you want to view, or the folder you want to open.
Important to note here is that you must always click on the blue filename, located right next to each file icon, instead of the gray text to the right of it, which says things like modify README - these would instead send you to a page showing you the most recent change to a specific file, which you usually don’t need.
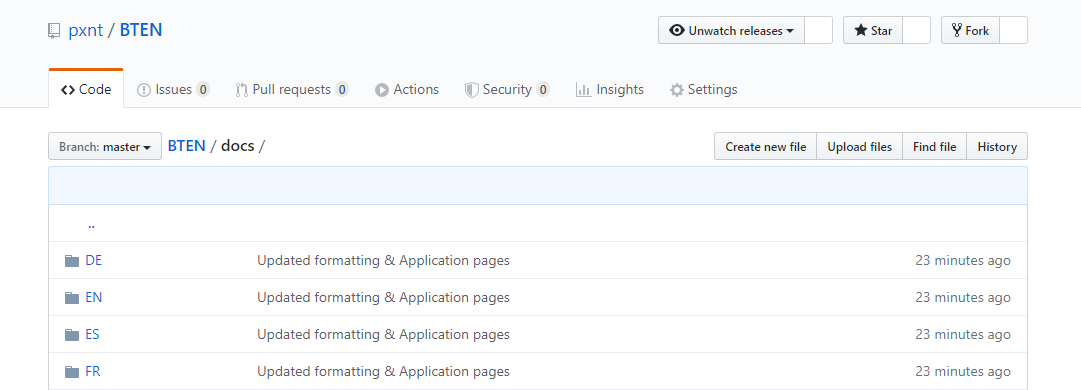
This section is outdated - the website’s files are now at main tree, not inside /docs/ Let’s together now go into the /docs/ folder by pressing on the “docs” name, which is where the website actually lives at. There should now be a long row of folders in front of you, many of which having language codes like “EN” and “DE”, others having more self-explanatory names like “main” or “icons”. To go back into the parent folder (the folder which this folder is in), you can always click on the “..” which are at the top of the file list.
Section 2: Creating new files
To create new files, you simply press the “Create new file” button located at the top right of any folder page. This doesn’t even need to be at the folder you want to place the file in, just make sure you’re not somewhere completely elsewhere, as you can only go deeper into the filesystem using the name. Go ahead, press that button now!
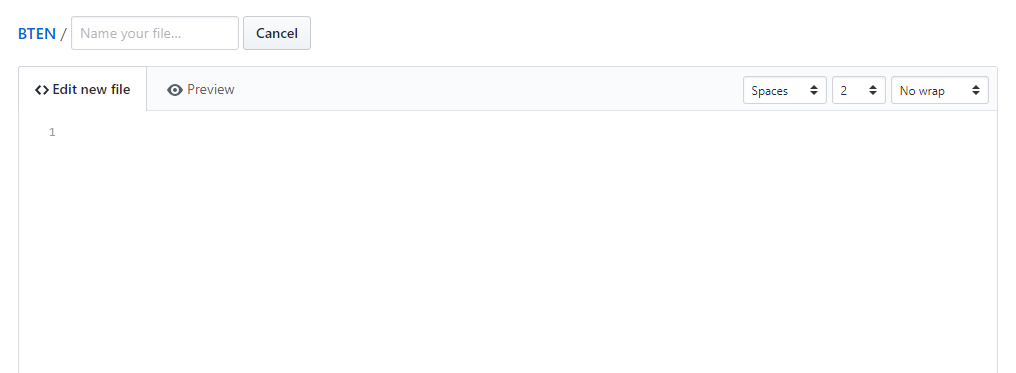
On the file creation page, you will now see a huge empty space waiting to be written into. Additionally, you see a small box at the top asking you to name your file. If you are in the wrong folder, you can simply add the names of the subfolder into this text box. This is also how you create new folders, by simply adding the new folder name into the text box, followed by a /, and then your file name.

Let’s try creating a file. You should still be looking at the file creation page, and the text before the name box should be BTEN/docs/. Into the box, type spam/. The text should have now moved outside of the box, and instead added itself to the folders to its left! Magic, right?

To create your file, let’s give it an actual name! How about your GitHub or Discord username and the current date? For me, this would be Pxnt-11052020. Enter your version of this, and don’t forget to add the file extension! As our website generator reads Markdown files, we need to make sure all of our files are markdown. Make yours one of the team by adding .md to the end!

You can now enter anything you like into the body of the file. If you don’t know how to work with markdown, just keep reading after this article and you’ll learn in no time! The next section will also show you how to access your websites.
Section 3: Committing
Once you’re finished, scroll down to “Commit changes”. Here, you can set a short and longer description of your changes if you like to. When making commits to the BTE:N Project, you must follow the naming instructions (that link will only work if you are a member of our Discord server. If you are a Team Member already, this will directly add your file to the website.

Section 3b: Pull Requests
If you aren’t a member of the BTEN Team yet, you will have create a new “branch.”
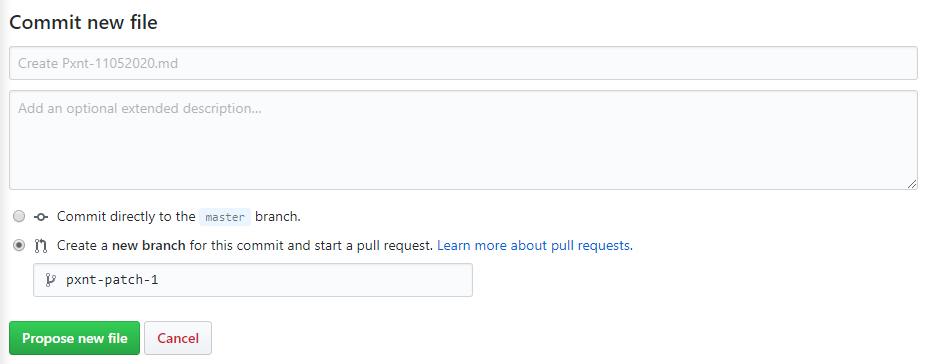
In this case, you can then send a pull request from the website you will be shown after pressing “Propose new file”.
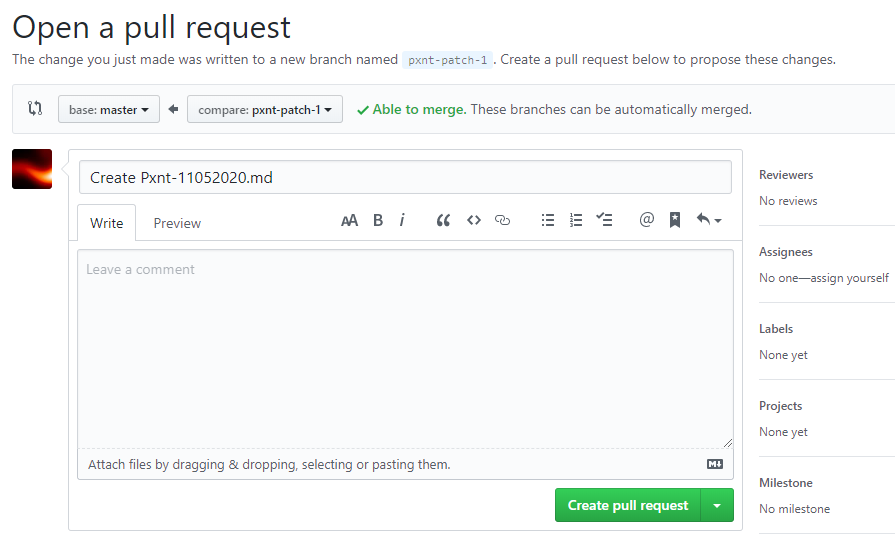
After pressing “Create pull request”, members from the Team can review and accept your pull request. After someone accepted it, you will be able to see your file in the /spam/ folder.
Section 4: Viewing your file
You should now be able to find it at /spam - my file, for example, is now here.
You should actually also be able to see your page on the website! For this, simply enter https://pxnt.github.io/spam/ and add yout file name, without extension. My file is now sitting here!
You have just been shown how to create a test file. Please only create random test files in /spam/ - not anywhere else. This is considered griefing and will cause you to receive a warning, and a removal from the project if done repeatedly.
Using Markdown
Section 1: Introduction
Markdown is the language we use to format every page. Thanks to a software called Jekyll, this markdown is then converted into html (the language websites are displayed with) and sent straight to our website. The reason we use markdown is because of its simplicity. Without knowing, you might have used it before, for example on Discord, Reddit, or even messengers like WhatsApp or Telegram.
Markdown allows us to make text bold, but much more importantly, allows us to embed images, add links, add headers and subheaders, and generally making the website many times more appealing than a simple wall of text. Ironically, this is still quite a wall of text, so I do apologize - and at the same time thank you for taking your time in reading it.
Section 2: Basic Markdown
There’s a few formatting rules you should know. These will quickly burn into your head if they haven’t already, so no need to worry!
*italic* or _italic_ becomes italic
**bold** becomes bold
*** becomes a page seperator
# text becomes a big headline
## text becomes a slightly smaller headline
### text becomes an even smaller headline
a couple of * or - underneath one another turn into a bulleted list
- such
- as
- this one
a couple of numbers like 1. and 2. underneath one another turn into a numbered list
- such
- as
- that one
Click here for a more detailed guide
Section 3: Links and Images
[Click here](https://bte-n.github.io/) becomes Click here
or save some text when you are on the same page: [Click here](/Documentation)
you can also link to a title:
[How do I use markdown?](#using-markdown)
to add an image, add a ! in front of your image link:
 becomes
Section 4: Jekyll Additions
Additionally to the usual markdown formatting, the website has some special tricks up its sleeve. For example, you can create an alert or info-box in seconds, by adding the specific tags.
To add a warning box to your text, use the following syntax.
{:.warning}
To add a warning box to your text, use the following syntax.
To add an info box to your text, use the following syntax.
{:.info}
To add an info box to your text, use the following syntax.
BTEN itself also has some templates which help when writing norms, for example:
{{ site.examples_EN }}
Would create the following box:
Where you’d replace “_EN” with the norm language code.
You can also add entire website content using Jekyll, however this is considered advanced and most likely, you won’t ever need it. If you do want to learn about it, or need it, just contact me (Pxnt)!
How to join
If you decided that you want to contribute to BTEN in one way or another, there are a few steps you need to take to become a member!
Step 1: Read the documentation
This one should be obvious (but is very important!), and you probably have done it already - read this page, at least the guidelines, but preferably everything.
Step 2: Create your GitHub account it you don’t have one already.
Step 3: Contact the Core Team via Discord.
Let us know that you want to be part, tell us how you want to contribute, and we’ll sort the rest out for you.
Step 4: Accept the invitation
Once you have been accepted into the team, you will receive an invite to our BTE:N organisation. You then need to accept the invitation using the link in the e-mail or by clicking here (this link will only work once you’re invited and logged in).
Step 5: Contribute!
Theoretically, there should be nothing in your way from translating, adding and editing on the Norm website.
Make sure to stay up-to-date with our discord server, as there you’ll get the latest news and discussions.
How to translate
Many of us nowadays are blessed with speaking more than one language, most people speak English as well as their native language, or alternatively have learned a language in school, to some extent up to fluently.
If this is you, we most likely need you! Our website is currently already being translated in many languages, but we’d love to have more and more people working on the same languages to ensure quality and thoroughness of all pages.
To become a translator, simply follow the joining BTEN Guide, and let us know of your spoken languages.
Once you’re member, you can start working on your language like so:
Section 1: What to translate
First, locate the page you want to translate, for example /EN/N2/1/1.
You can start searching for untranslated pages by comparing the folder of your language with the English one, or by checking the index for links that don’t function in your language.
Some pages don’t need translation or only ask for limited amounts of translations. Those pages usually mention this on the page itself.
Section 2: Preparing the translation
Find the corresponding file on the github directory. For this, you need to go to the main GitHub directory
Then, search for the file. You can navigate the system by first clicking on your source language (usually English, so EN), and then follow the folders the same way the norm ID is set up (N2.1.1). In this case, you will find /EN/N2/1/1.md
Copy the site’s content by clicking on the “Raw” button on the right, next to “Blame” and “History”. This would lead you to raw.githubusercontent.com - just press CTRL+A (Select All) and then CTRL+C (Copy) to get the pages’s content.
Press “Create new file” in the folder where you’d find the file - you might need to create folders along your way (your language ID -> N# -> #. Read the tutorial for creating files for more information) - there you will create a file with the last ID digit as the name (3.md for example), for the example of french, this would be https://github.com/BTE-N/bte-n.github.io/tree/master/FR/N2/1/ - this would lead you to https://github.com/BTE-N/bte-n.github.io/new/master/FR/N2/1/
Paste your clipboard (CTRL+V) into the large field. The name will be the Norm-ID (here “3”) plus the file extension (always “.md”)
You can now edit and translate the large field as you are used to. Make use of the “Preview” button to ensure you’re doing well.
Once finished, scroll all the way down and give your commit the appopriate title and press the green button called “Commit new file”.
If you realized you made a mistake, navigate to your translated file, and press the pen icon on the top right to edit the file, and commit in the end.
Adding new norms
Please talk to the Core Team before adding a norm.
- Press “Create new file” in https://github.com/BTE-N/bte-n.github.io/tree/master/ - this leads you to https://github.com/BTE-N/bte-n.github.io/new/master/
I recommend to copy an existing norm file in your language to follow the layout instructions easier.
When naming the norm, first enter the norm ID in this format:[language, ex. EN]/[norm-topic, ex. N3]/[subnumber(s), ex. 2]/[last number, ex. 1].md, so an example would beEN/N3/2/1.md - Create your Norm.
- Once finished, scroll all the way down and press the green button called “Commit new file”.
- Edit the Index page in your language by pressing the “pen” icon on the top right and add your Norm. Use neighboring Norms to know how to format yours. Do not skip this step, or your norm will not be accessible for users.
- Follow the committing instructions in
#how-toto adhere to the naming regulations regarding commit titles. - Paste your Norm URL plus a short text describing it (or a title) into
#generalto alert translators and team members of your addition.
This page is subject to change and will always reflect the current tutorials and more. Please come back frequently to make sure you’re not missing anything.
Editing this page is considered griefing.